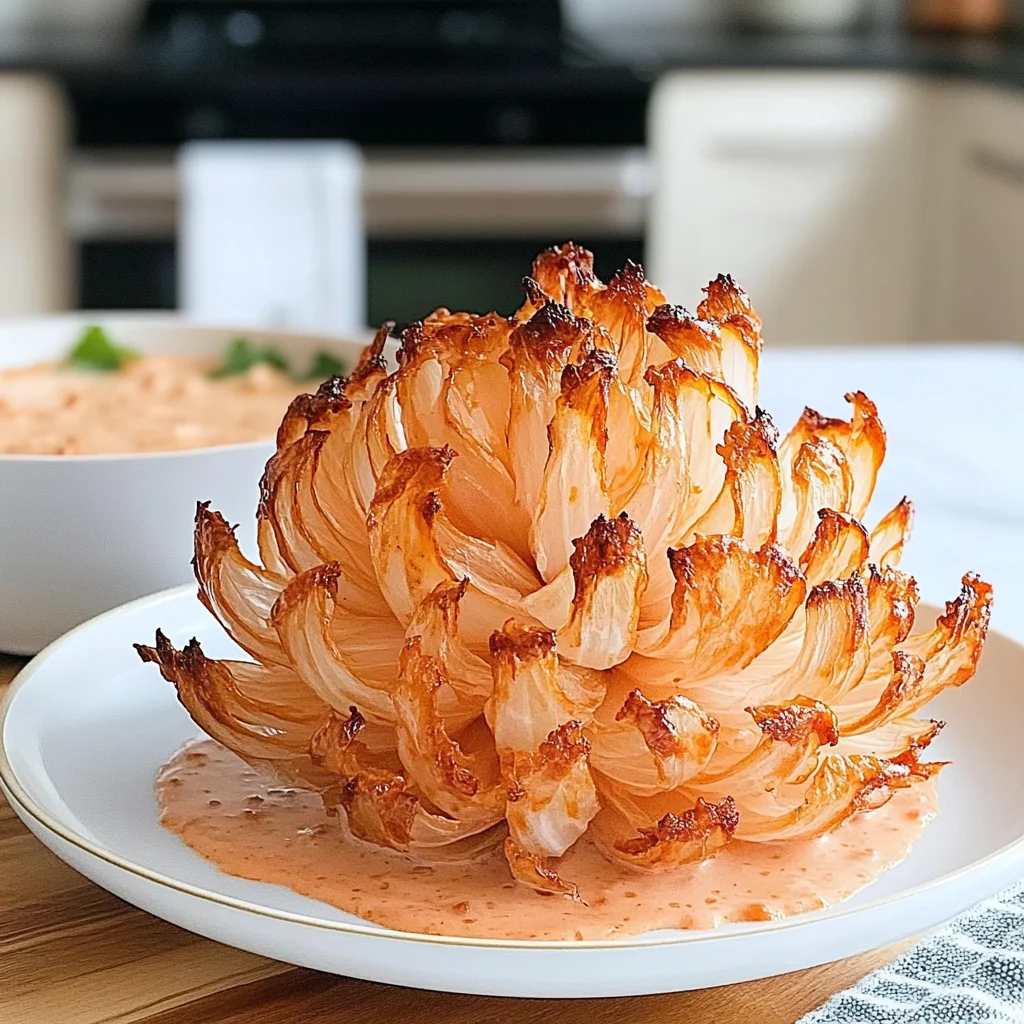
Imagine sinking your teeth into a perfectly crispy, golden-brown Blooming Onion, its delicate petals inviting you to explore a world of savory flavor and satisfying crunch. The tantalizing aroma wafts through the air, mingling with laughter and chatter, making it the ultimate appetizer for gatherings where friends and family come together to indulge in shared delights.
I still remember the first time I tried this masterpiece at a local fair, where the excitement of biting into that beautifully layered onion felt like a rite of passage. Whether it’s game day or a cozy get-together, this dish promises to elevate any occasion, leaving taste buds dancing in anticipation and hearts warmed by the joy of sharing something truly special.
Why Is Blooming Onion So Irresistibly Good?
Crispy texture: The outer layer of the Blooming Onion offers an incredibly crispy bite that perfectly contrasts with the tender, sweet onion inside.
Flavor explosion: Packed with spices like paprika, garlic, and cayenne, each petal bursts with flavor, making it a delightful treat for your taste buds.
Easy to share: This appetizer resembles a blooming flower, inviting everyone to dig in together and share the deliciousness.
Versatile dipping options: Pair it with a zesty dipping sauce made from mayonnaise and ketchup, or add horseradish for an extra kick!
Quick prep time: With just 20 minutes of prep and 30 minutes of cook time, you can whip up this crowd-pleaser without spending hours in the kitchen.
Blooming Onion Ingredients
- 1 large Vidalia onion (or any large sweet onion) – A sweet onion adds the perfect flavor for your Blooming Onion, ensuring a delightful bite.
For the Batter
- 1 cup all-purpose flour – This forms a crispy coating that locks in moisture and flavor.
- 1 cup buttermilk – The acidity helps tenderize the onion, creating a richer taste.
- 1 large egg – Binds the batter together for an even coating on each petal.
- 2 teaspoons paprika – Adds a warm color and subtle smokiness to the batter.
- 1 teaspoon garlic powder – Enhances flavor with a savory kick that complements the onion beautifully.
- 1 teaspoon onion powder – Intensifies the onion flavor, giving it extra depth in every bite.
- 1 teaspoon cayenne pepper (adjust for spice preference) – Adds a bit of heat that can be adjusted to your liking.
- 1 teaspoon salt – Essential for enhancing all the other flavors in this delectable dish.
- 1 teaspoon black pepper – Provides a mild spiciness that rounds out the seasoning blend.
For the Dipping Sauce
- 1 cup mayonnaise – Acts as a creamy base that balances well with the spices in the sauce.
- 2 tablespoons ketchup – Adds sweetness and tang, making it an irresistible dip for your Blooming Onion.
- 1 teaspoon horseradish (optional) – Gives an extra kick if you enjoy some heat in your dipping sauce.
- 1 teaspoon paprika – Mirrors the batter’s flavor, bringing unity to your dish’s taste profile.
- 1 teaspoon lemon juice – Brightens up the sauce with a refreshing zing that cuts through the richness.
How to Make Blooming Onion
1. Prepare the onion: Cut the top off the large Vidalia onion and peel it beautifully. Place it cut-side down, then carefully make 12-16 vertical cuts down to the root, ensuring you don’t cut through completely.
2. Mix the batter: In a mixing bowl, whisk together 1 cup of all-purpose flour, 2 teaspoons of paprika, 1 teaspoon each of garlic powder, onion powder, cayenne pepper (adjust for spice preference), salt, and black pepper. This blend will add wonderful flavor!
3. Combine wet ingredients: In another bowl, mix together 1 cup of buttermilk and 1 large egg until well combined. This will create a luscious coating for your onion.
4. Coat the onion: Dip your prepared onion into the buttermilk mixture first, allowing it to soak up that creamy goodness. Then, coat it generously in the flour mixture. For a thicker crust, repeat this step!
5. Heat oil: In a deep fryer, heat oil to a sizzling 350°F (175°C). This is the perfect temperature to achieve a golden brown and crispy exterior on your blooming onion.
6. Fry the onion: Carefully lower the battered onion into the hot oil and fry for 10-15 minutes. Keep an eye on it; you want it to turn a beautiful golden color and become irresistibly crispy.
7. Drain excess oil: Once fried to perfection, remove the blooming onion from the oil and let it drain on paper towels. This helps eliminate any excess oil for a lighter bite.
8. For the sauce: In a small bowl, mix together 1 cup of mayonnaise, 2 tablespoons of ketchup, 1 teaspoon of horseradish (optional), 1 teaspoon of paprika, and 1 teaspoon of lemon juice until smooth and tangy.
9. Serve immediately: Present your blooming onion hot with that delightful dipping sauce on the side—perfect for sharing at gatherings or simply indulging at home!
Optional: Garnish with fresh herbs for an extra touch.
Exact quantities are listed in the recipe card below.
Tips for the Best Blooming Onion
- Onion Choice: Choose a large Vidalia onion for optimal sweetness and size, ensuring even cooking and flavor.
- Cutting Technique: Make sure to cut deep enough without slicing through the root to maintain the onion’s shape while blooming.
- Double-Dip for Crunch: For an extra crispy coating, dip the onion in the buttermilk mixture, then coat it in flour again before frying.
- Oil Temperature: Maintain the oil at 350°F (175°C) to achieve that perfect golden-brown finish; too low will result in sogginess.
- Draining Properly: After frying, let the blooming onion drain on paper towels to remove excess oil, enhancing its crispy texture.
- Dipping Sauce Balance: Adjust horseradish in your dipping sauce to suit your taste; it adds a delightful kick without overpowering the dish.
How to Store and Freeze Blooming Onion

- Fridge: Store leftover Blooming Onion in an airtight container for up to 3 days to keep it fresh and crispy.
- Freezer: For longer storage, freeze the cooked onion on a baking sheet until solid, then transfer to a freezer bag for up to 2 months.
- Reheating: Reheat in an oven at 350°F (175°C) for about 10-15 minutes until heated through and crispy again.
- Dipping Sauce: Keep any leftover dipping sauce in the fridge in an airtight container for up to 5 days.
Blooming Onion Variations
Feel free to personalize this crispy delight with these fun twists and flavors that will make every bite unique!
- Gluten-Free: Swap all-purpose flour with a gluten-free blend for a deliciously crispy texture without the gluten. You won’t even miss the traditional flour—your guests will be raving about this version just as much!
- Spice Lovers: Increase the cayenne pepper to two teaspoons for an extra kick. This fiery option is perfect for those who love a little heat in their appetizers—just be ready for some fun reactions from your spice-loving friends!
- Herb Infusion: Add 1 tablespoon of dried herbs like oregano or thyme to the batter for an aromatic twist. Fresh herbs can also be used to elevate the flavor, making each petal of onion burst with herbal goodness.
- Cheesy Bites: Mix in 1 cup of shredded cheddar cheese to the batter for a rich, cheesy flavor. This variation adds a delightful melty surprise that pairs perfectly with the crispy onion petals!
- Vegan-Friendly: Substitute buttermilk with plant-based milk mixed with a tablespoon of vinegar and replace the egg with flaxseed meal. Enjoy all the crunchiness without any animal products while still serving up a delicious appetizer.
- Zesty Dip: Incorporate fresh horseradish into your dipping sauce for an added zing. This tangy addition will elevate your classic dip and create an unforgettable pairing with your blooming masterpiece.
- Sweet & Spicy: Add a tablespoon of honey to the dipping sauce for a sweet contrast to the spicy batter. The balance of flavors will keep everyone coming back for more, creating a delightful harmony on your taste buds.
- Asian-Inspired: Replace paprika with sesame seeds and add soy sauce to your dipping sauce instead of ketchup. This twist transforms your appetizer into an exciting fusion dish that surprises and delights!
Make Ahead Options
Preparing a Blooming Onion is not only fun but also perfect for meal prep, making it an ideal choice for gatherings and family nights. You can prep the batter in advance by whisking together 1 cup of all-purpose flour with 2 teaspoons of paprika, 1 teaspoon each of garlic powder, onion powder, cayenne pepper, salt, and black pepper. Additionally, mix 1 cup of buttermilk with 1 large egg ahead of time. For the onion itself, simply cut the top off and peel it before making 12-16 vertical cuts down to the root, ensuring you don’t cut through completely. This process can be done up to 24 hours in advance. As for the dipping sauce, combine 1 cup of mayonnaise with 2 tablespoons of ketchup, 1 teaspoon of horseradish (optional), 1 teaspoon of paprika, and 1 teaspoon of lemon juice; this can be made up to 3 days ahead and stored in the refrigerator. When you’re ready to serve your delicious Blooming Onion, just dip it into the buttermilk mixture, coat it in the flour mixture again if you prefer a thicker crust, fry it until golden brown, and enjoy!
Blooming Onion Recipe FAQs
What type of onion is best for a blooming onion?
For the best results, I recommend using a large Vidalia onion or any other large sweet onion. These types have a naturally sweeter flavor that complements the savory batter beautifully, giving your blooming onion that perfect balance of sweetness and spice.
Can I make the batter ahead of time?
Absolutely! You can prepare the batter up to 24 hours in advance. Just mix the dry ingredients and store them in an airtight container. When you’re ready to fry, whisk together with the buttermilk and egg as indicated in the recipe. This will save you time on busy cooking days!
How should I store leftover blooming onion?
If you happen to have leftovers (which is rare!), store them in an airtight container in the refrigerator for up to 2 days. Reheat them in an oven at 350°F (175°C) for about 10-15 minutes to regain some of their crispiness before serving again.
Can I freeze blooming onion?
While it’s best enjoyed fresh, you can freeze the uncooked, battered blooming onion before frying. Wrap it tightly in plastic wrap and then foil, storing it in the freezer for up to a month. When you’re ready to enjoy it, fry it straight from frozen—just add an extra few minutes to your frying time.
What if my blooming onion doesn’t open correctly?
Sometimes, if your cuts aren’t deep enough or evenly spaced, the petals may not bloom as beautifully as you’d like. Ensure you cut 12-16 vertical slices down to the root without cutting through completely. If it still doesn’t bloom well, don’t worry—it’s still going to be delicious!
How many servings does this recipe yield?
This delightful recipe serves about 4 people, making it perfect for sharing at gatherings or family meals. Each serving has approximately 300 calories, so it’s a tasty option that fits nicely into your appetizer lineup!
Leave a Comment